General
How To: Add Additional Elastic IPs to AWS EC2 Instances
Posted on .The following are steps to add additional elastic IPs to AWS EC2 Instances:
1 – Associate a new Private IP with the EC2 Instance
This is a compulsory step because private IPs can only have one Elastic IP associated with them.
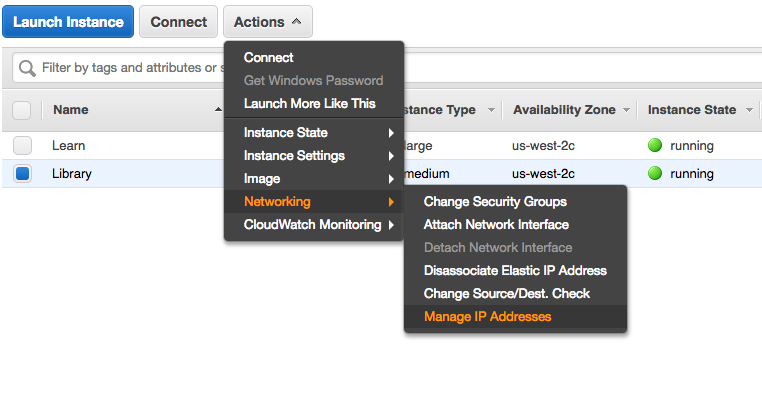
Select the Instance, then choose Actions > Manage Private IP Addresses

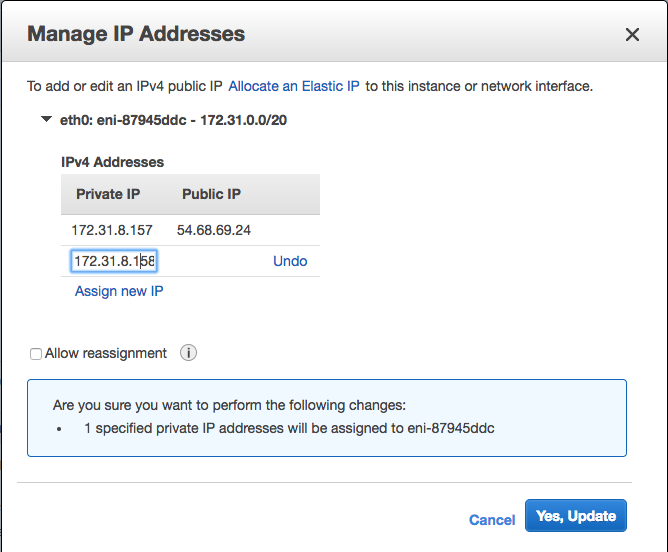
In the Manage Private IP Addresses dialog box, Click Assign New IP. You may enter a specific IP address within the subnet range of the existing IP, or leave it blank to have one automatically assigned. I usually increment the last set of digits (of the existing IP) by 1. Click Yes, Update.

2 – Associate Private IP with the Network Interface
Open a Secure Shell (SSH) connection to your server and execute the following command to associate your chosen or assigned private IP to the instance’s network interface, usually eth0. Be sure to replace the IP and interface name, you can get those by executing ifconfig following SSH authentication.
$ ip addr add 172.31.8.77/20 dev eth0At this point, you should be able to ping the additional private IP, however the private IP will be removed after a system reboot. To ensure the IP’s access persist through reboots, you should modify /etc/network/interfaces.d/eth0.cfg (assuming eth0 is the network interface associated with the IP).
$ echo 'up ip addr add 172.31.8.77/20 dev eth0' >> /etc/network/interfaces.d/eth0.cfg3 – Assign an Elastic IP
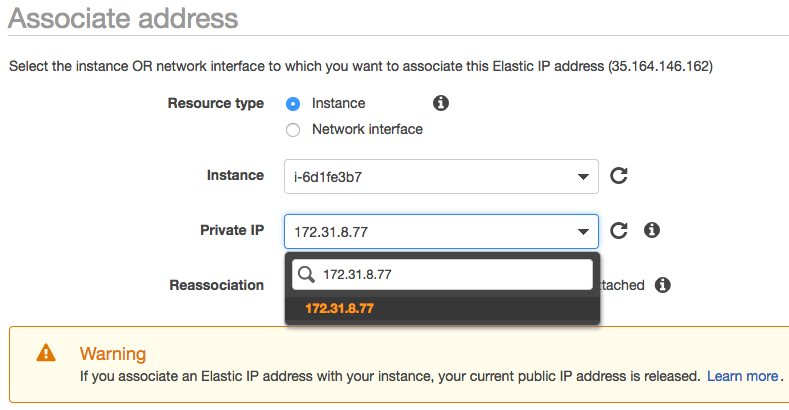
In the AWS Console, navigate to the EC2 section and select Elastic IPs under the Network & Security section. Click Allocate new address, select the allocated IP address, right-click and Associate Address.

If you followed all the steps above, you should now have an additional elastic IP address that persists through reboots.
Notes
Checking if the ip was added
Use the following command to make sure the private IP was properly added to the instance. The new IP will be listed in the results if all is well.
ip addr list dev eth0Removing a private IP from the instance
This command will remove an IP address:
ip addr del172.31.8.77/20 dev eth0Be sure to remove the associated line in /etc/network/interfaces.d/eth0.cfg.
REF: https://mikeeverhart.net/2015/04/add-elastic-ips-to-aws-ec2-instances/